How To Create a Client Portal in WordPress
Do you want to create a client portal on your WordPress site?
As a business owner providing various services to clients, you probably use different tools to share files and documents and manage your client’s projects. The problem with using multiple tools is that it can become overwhelming and too complex to manage.
When you have multiple platforms for invoicing, sending proposals, receipts, sharing files, and communicating with your clients, your business process becomes cumbersome, and your clients get a bad customer experience.
However, there is an easy way out. You can create a client portal to streamline your business and keep all your clients’ resources in one place.
A client portal is a private dedicated area that allows your customers to see projects, information, tasks, invoices, receipts, and more in one place. It enables you to easily communicate with your clients and also ensure they can keep track of how the project is going, all from a single location.
In this article, we will learn how to create a client portal in WordPress.
Table of Contents
Why should you create a client portal in WordPress?
A client portal offers a bunch of benefits to business owners. It is a great way to enhance your service offering and improve customer experience.
A client portal makes it easy to manage your clients’ information and resources from a single place. With a client portal, you can improve collaboration and communication by having a single source of truth for all your clients’ files and projects.
A client portal also helps you save time to focus on the more essential things. It lets you speed up the data collection and communication with your client.
For example, if you offer design services, you can create a client portal on your WordPress site to share downloadable resources, updates, PSD files, news, and more with your clients.
This makes it easy for your clients to access deliverables and other information anytime they need it without emailing you.
Let’s see how to save time, free up your resources, and make your customers happy by creating a client portal in WordPress.
How to Create a Client Portal in WordPress
WordPress is the most popular content management system because of its flexibility and massive collection of plugins that can help us extend its functionalities.
For us to be able to create a client portal, we will need the help of a WordPress plugin to extend the capabilities of our WordPress site.
For this article, we will be using ProfilePress.
ProfilePress is the best WordPress membership plugin. It allows you to create membership sites with members-only content for your clients easily. ProfilePress has a robust access control feature that will enable you to create flexible and powerful display rules for segmenting your client portal.
With ProfilePress, you can restrict posts, pages, categories, files, and more, allowing you to accept payments from your clients using multiple payment gateways.
The sections below will cover all the steps for creating a client portal on your WordPress website.
Install and activate ProfilePress.
The first step in this process is to install and activate the ProfilePress plugin. You will need to purchase a ProfilePress Pro License and install the ProfilePress plugin.
After purchasing your copy of the ProfilePress Plugin, you will receive a confirmation email with a link to download the plugin zip file and your license key. You can also download the plugin from your account page on the ProfilePress website.
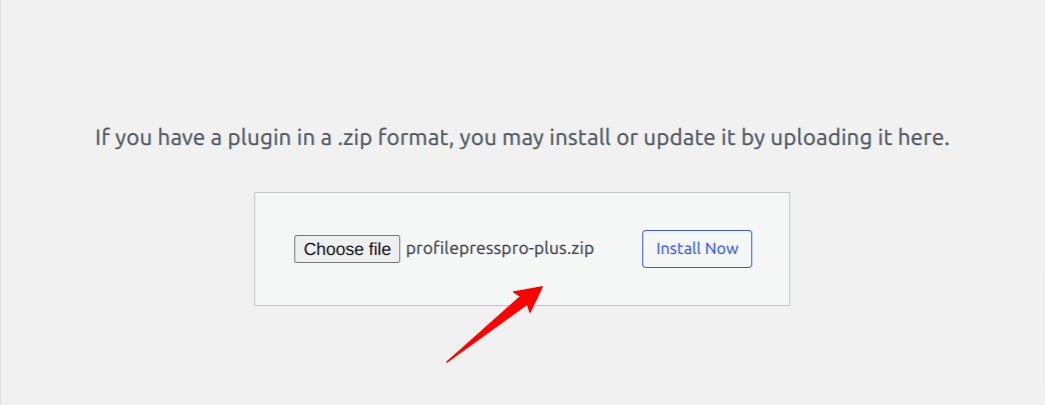
Once you have downloaded the plugin, login to your WordPress admin dashboard, and navigate to the Plugins page; click on the “Add New” button and click “Upload Plugin“.
Next, click “Choose file” to select the previously downloaded plugin zip file. Click “Install Now.”
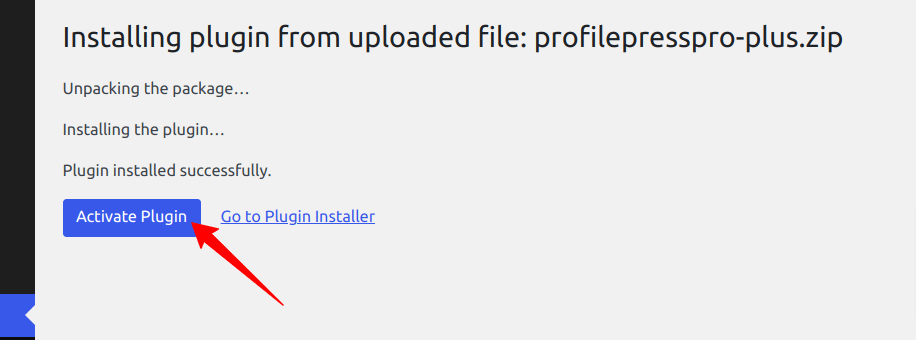
After installation is complete, click the Activate Plugin button.
At the top of the page, you will see a notification that says, “ProfilePress needs to create several pages,” Click on the “Create Pages” button to complete the plugin setup.
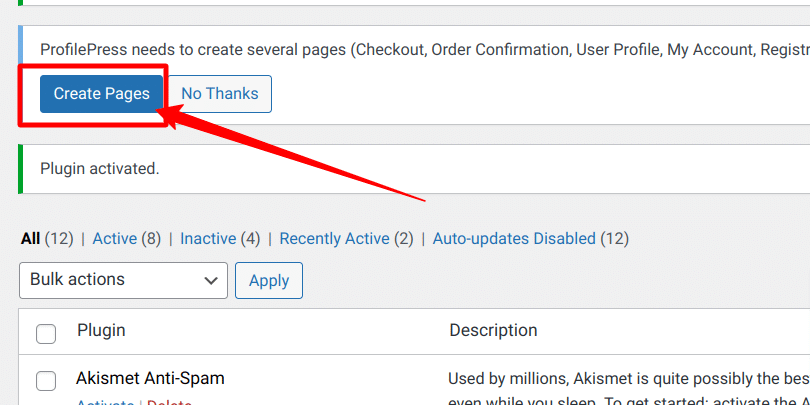
If you do not see this notification, navigate to ProfilePress > Dashboard and click the “Create pages” button to complete the plugin setup.
With this done, we have completed the initial setup of the ProfilePress plugin on our WordPress site.
Setup a Payment Gateway
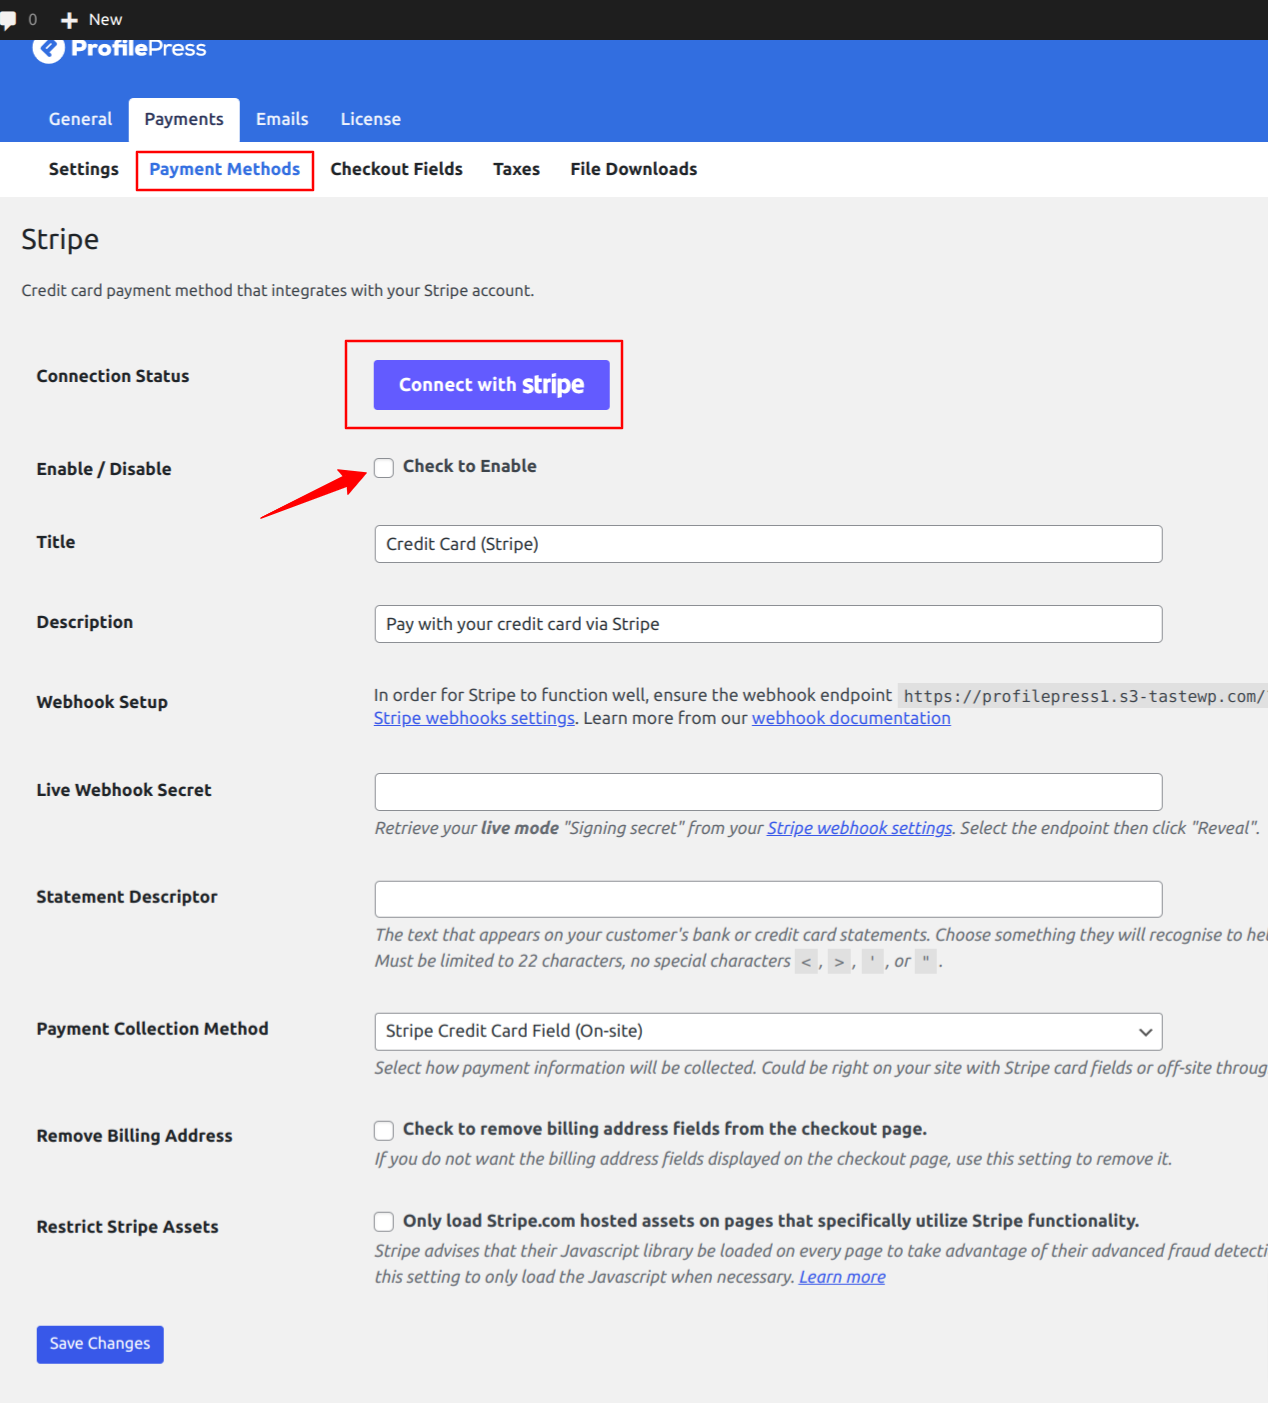
After installing and activating the ProfilePress plugin, the next step is to set up a payment gateway, and in this guide, we will use the Stripe Payment gateway for our WordPress client portal.
You can configure the Stripe payments on your site by navigating to ProfilePress > Settings > Payments > Payment Methods and choosing Stripe.
Click on the “Connect Stripe” button, follow the prompts, and you are all set to start accepting payments from your customers.
If you don’t want to use Stripe, ProfilePress supports other popular payment gateways like PayPal, Razorpay, Paystack, and Mollie.
Create a Membership Plan for Your Clients
After setting up a payment method, you can create a membership plan for your clients. A membership plan allows you to restrict content access to specific users on your WordPress website, which is a crucial feature for a client portal.
It would be best if you were sure that each user can access only the information they are permitted to view, and that is what a membership plan will help us to achieve.
Go to ProfilePress >> Membership Plans to create a new membership plan or open up the edit screen of an existing one.
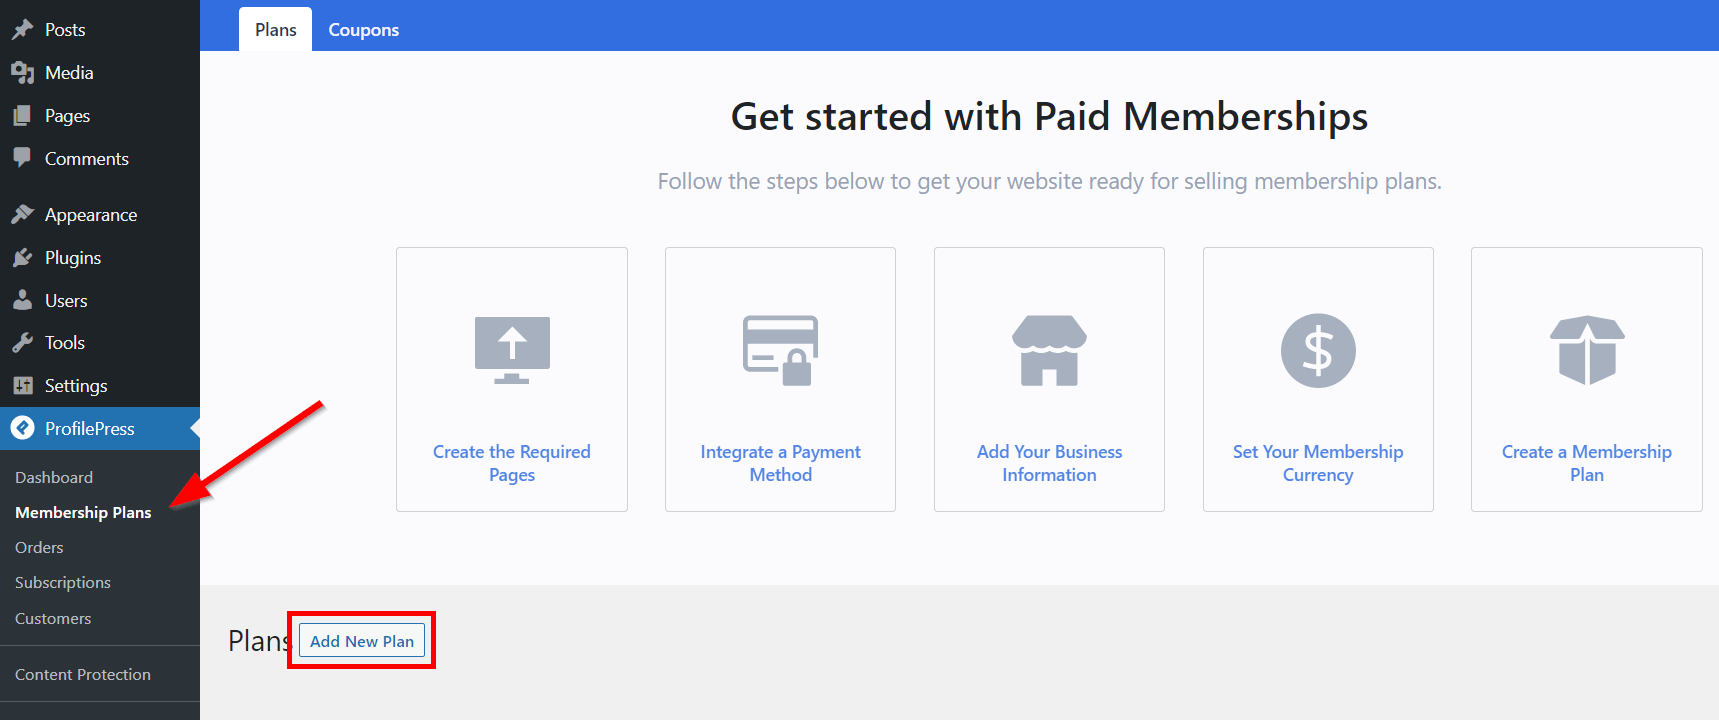
Click on “Add New Plan,” and you will be taken to the page where you can add a plan and set up the details for your product.
Under Plan Details, input the Plan name, Description, Purchase Note, User Role, and Price.
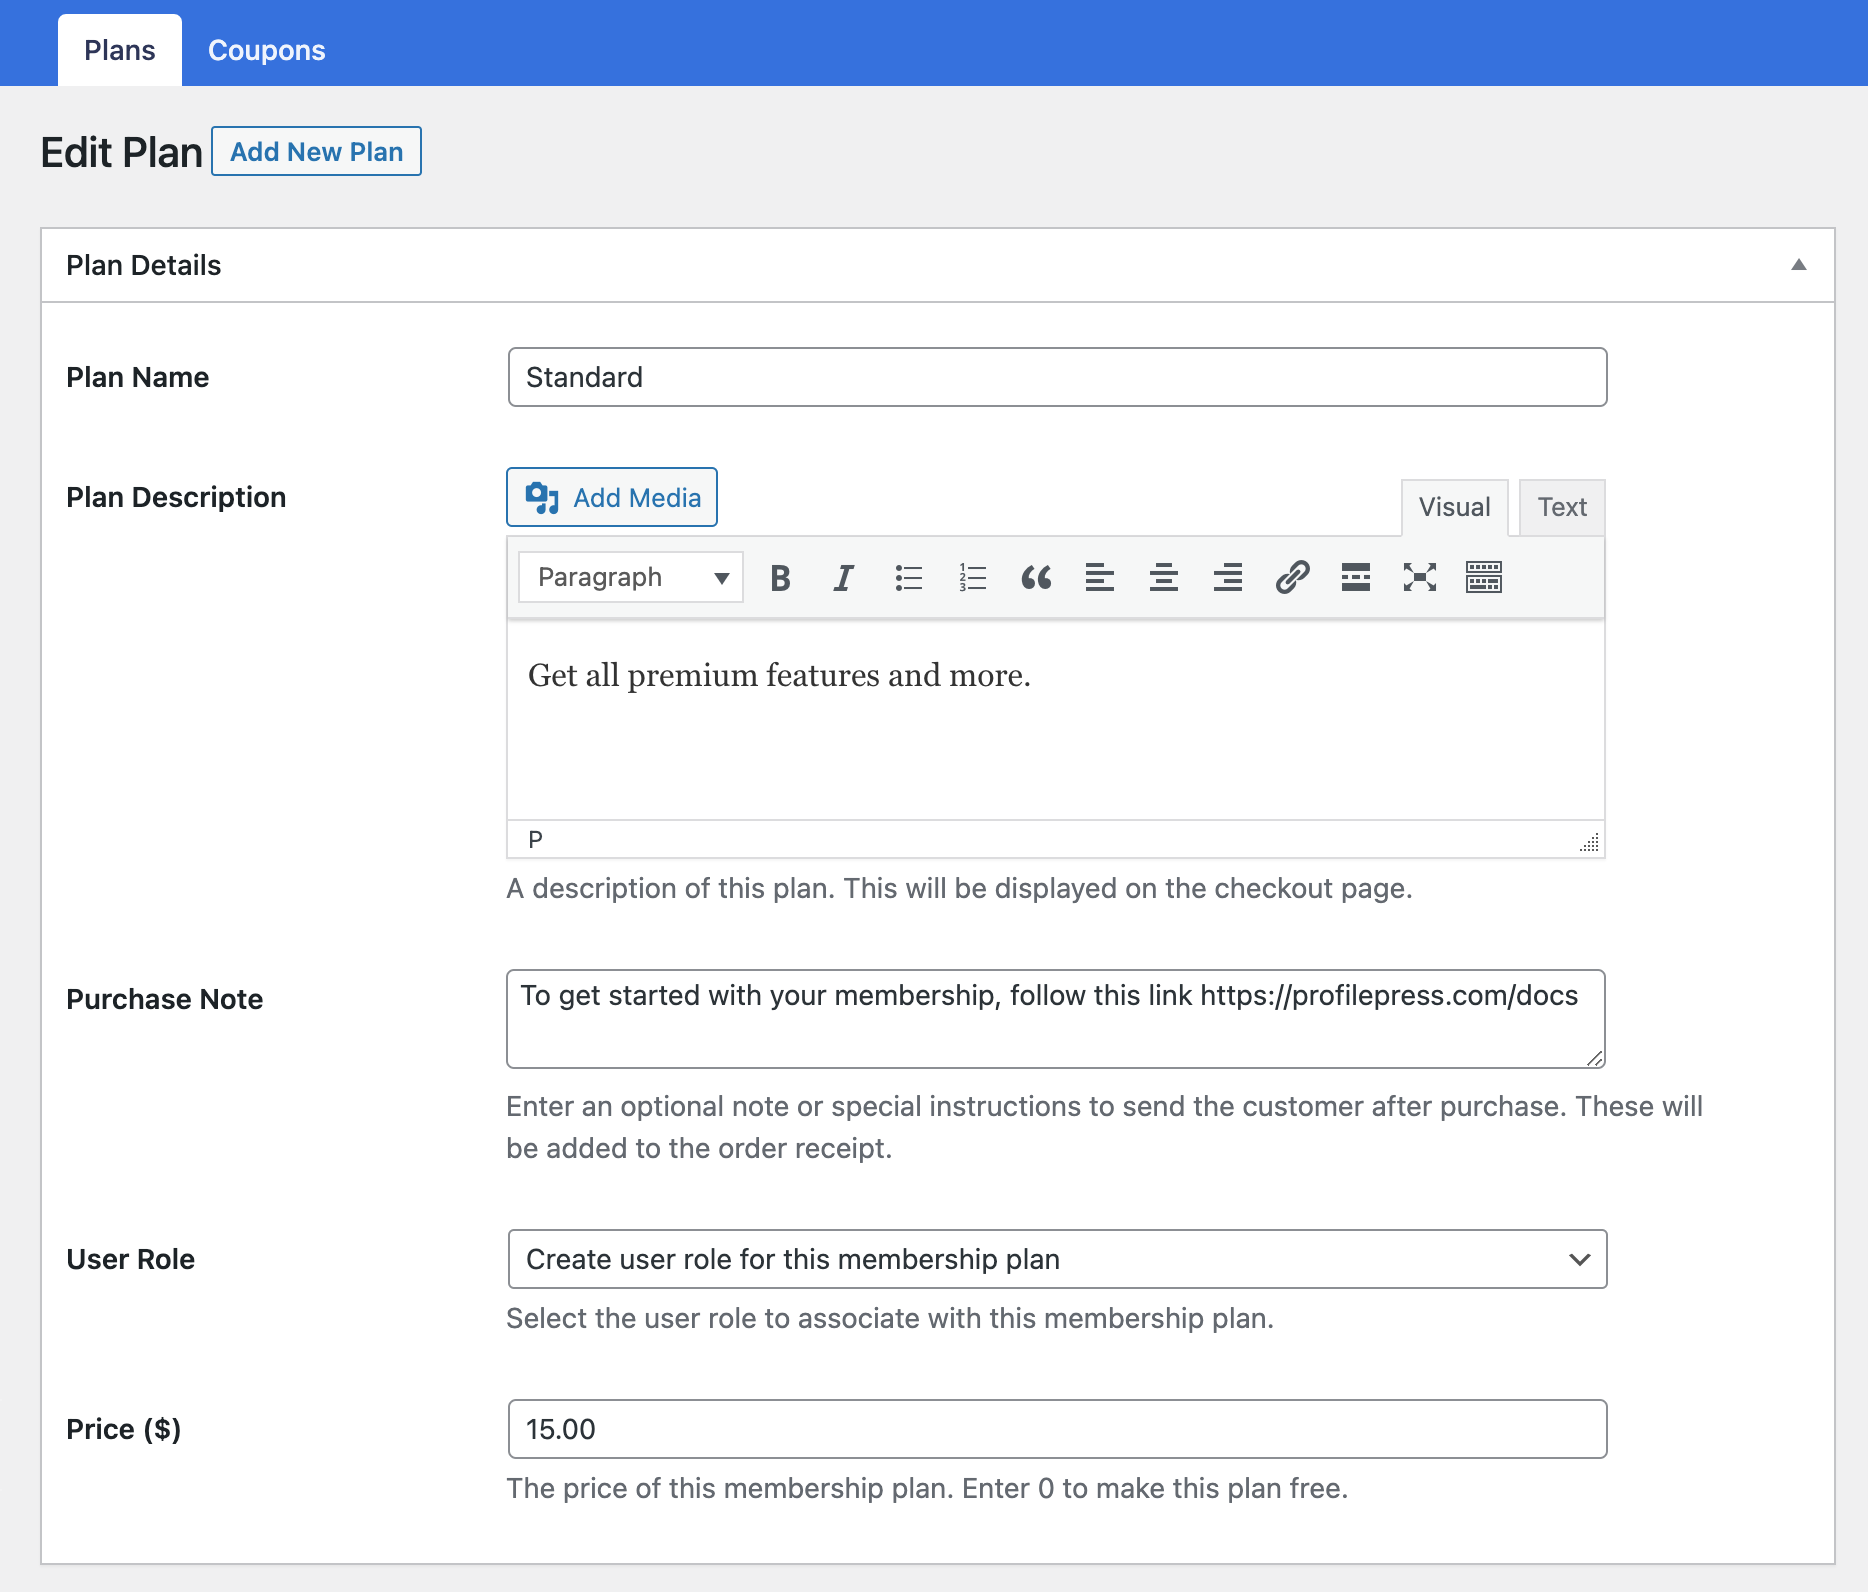
You can also enter a Purchase Note, a great place to add a thank you note, usage instructions, or a request for review.
Next, select the user role to associate with the plan. The recommendation is to select “create a user role for this membership plan” to create and associate a new role based on the plan name. Users who subscribe to this plan will be assigned this user role. This is particularly useful since we will have a conditional display of elements and contents or trigger specific actions based on user roles.
Next, the “Subscription Settings” meta box to create a billing cycle. For example, you might charge clients a one-time fee for lifetime access or set up a recurring monthly subscription.
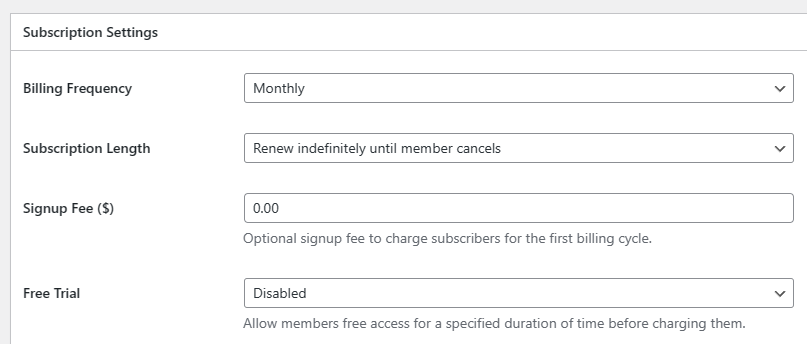
- Select a billing frequency: daily, weekly, monthly, yearly, or one-time payment.
- Select a subscription length: renews indefinitely until a member cancels or has a fixed number of payments.
Remember that once a member has completed the last subscription payment with a fixed number of payments, the subscription will not expire—essentially giving them lifetime access.
The default setting for Plans that renew indefinitely is to renew automatically until the member cancels their subscription or membership.
Other settings are available on this page, but most are self-explanatory. You can look through them and configure them as you wish.
ProfilePress allows you to create unlimited membership plans with different settings, pricing, and access levels. To create more membership plans, follow the same process described above.
Create Membership Rules for Your Clients
After creating a membership plan, you need to set up some access rules to control each client’s access to your website’s files, pages, and resources. These rules will enable you to create a private and exclusive access area for your clients in WordPress.
To get started, Navigate to ProfilePress > Content Protection and click the Add a New Protection Rule button.
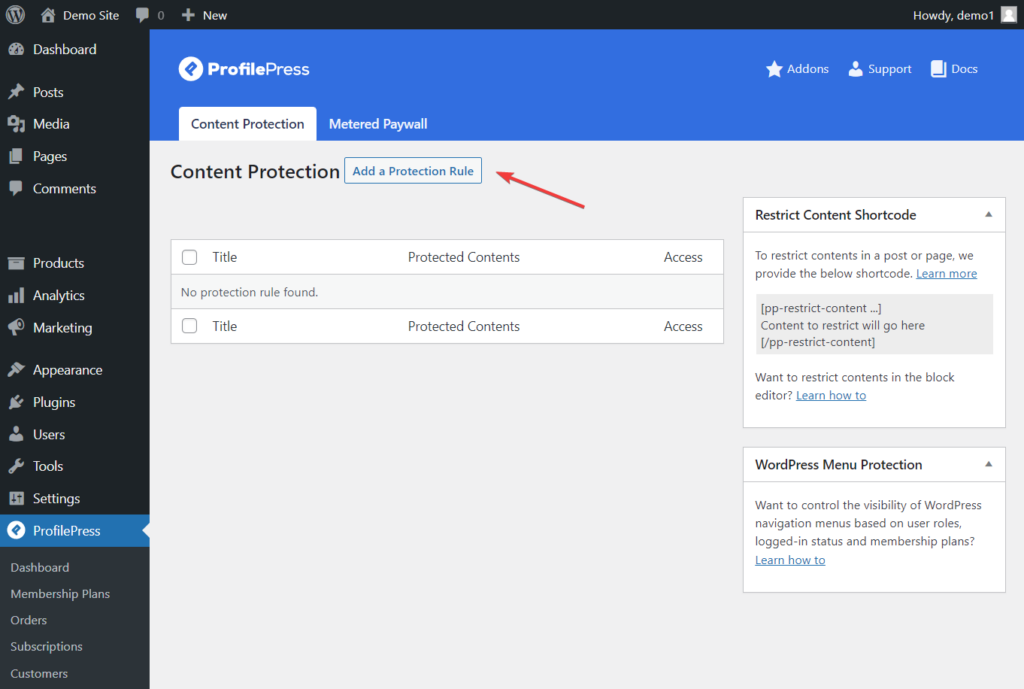
When you click the button, you will be taken to the Protection Rule editing page. This is where you will choose what content you want to restrict.
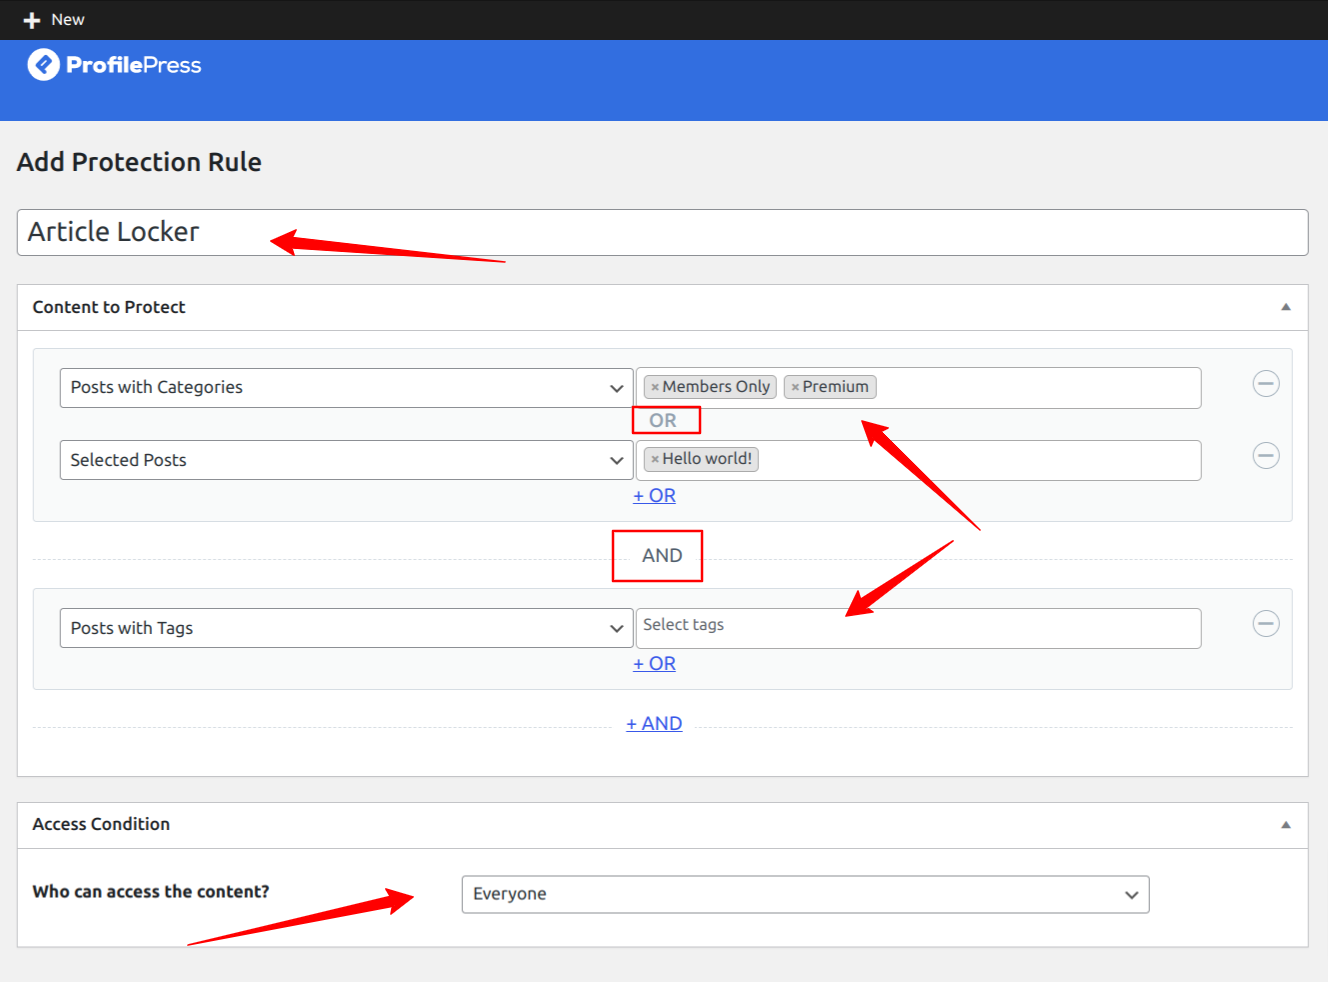
Enter a descriptive title for the rule you create, select the content you protect, use the logical OR/AND to set the rules, and use the access condition to select who can access the content.
The Access Condition section allows you to assign who can access the content you want to protect, such as:
- Everyone (all users will have access to the content),
- Logged-in users (only those who are logged in can access the content)
- Logged-out users (only those not logged in to your website can access the protected content).
The Logical AND rule only kicks in when all grouped conditions are true, and the Logical OR rule happens when one of the conditions in a group is true.
In the screenshot above, we used the OR logic, where the protection rule will kick in when anyone accesses either of the selected posts or pages. Of course, this means you want everyone to access the selected post and page.
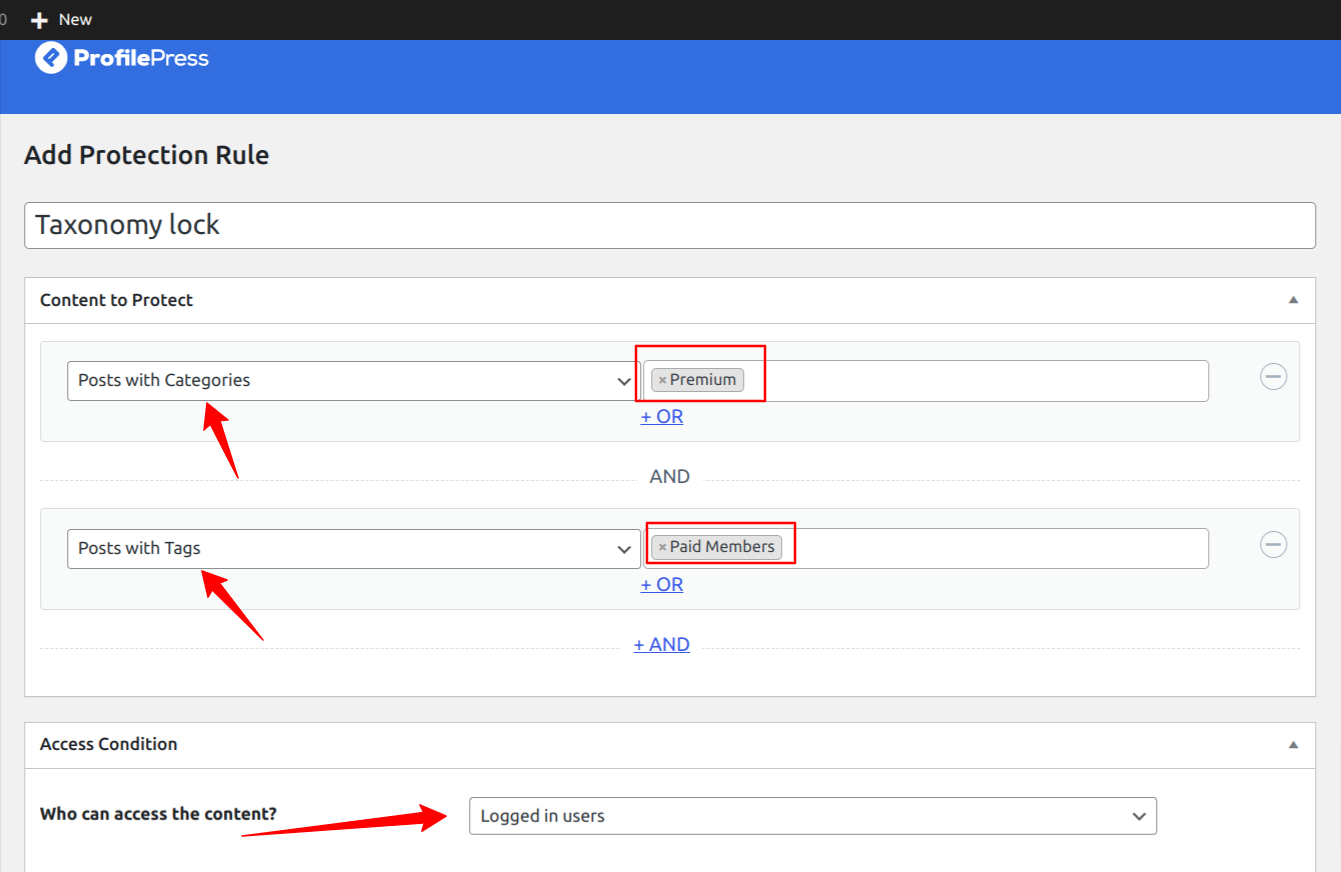
The rule above will restrict posts on your site that belong to the “premium” category and “Paid members” tag to logged-in users only. You can create a ‘Client Portal’ category and restrict access to all posts that belong to this category.
Next, you must go to the Access Condition section on the rules editing page to configure who can access the premium content.
In the Access Condition section, select Logged in users from the dropdown menu against the “Who Can Access the Content?” option.
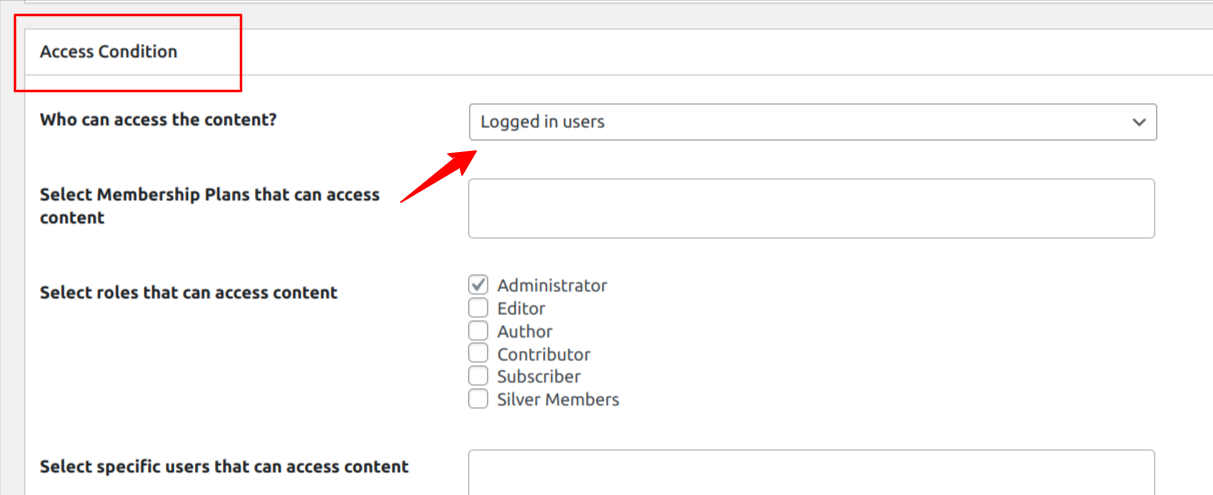
You can show unauthorized users the global restriction message, a custom message, or the post excerpt or redirect them to a specific page.
As soon as you select the Logged in users option, several new options appear in the Access Condition section.
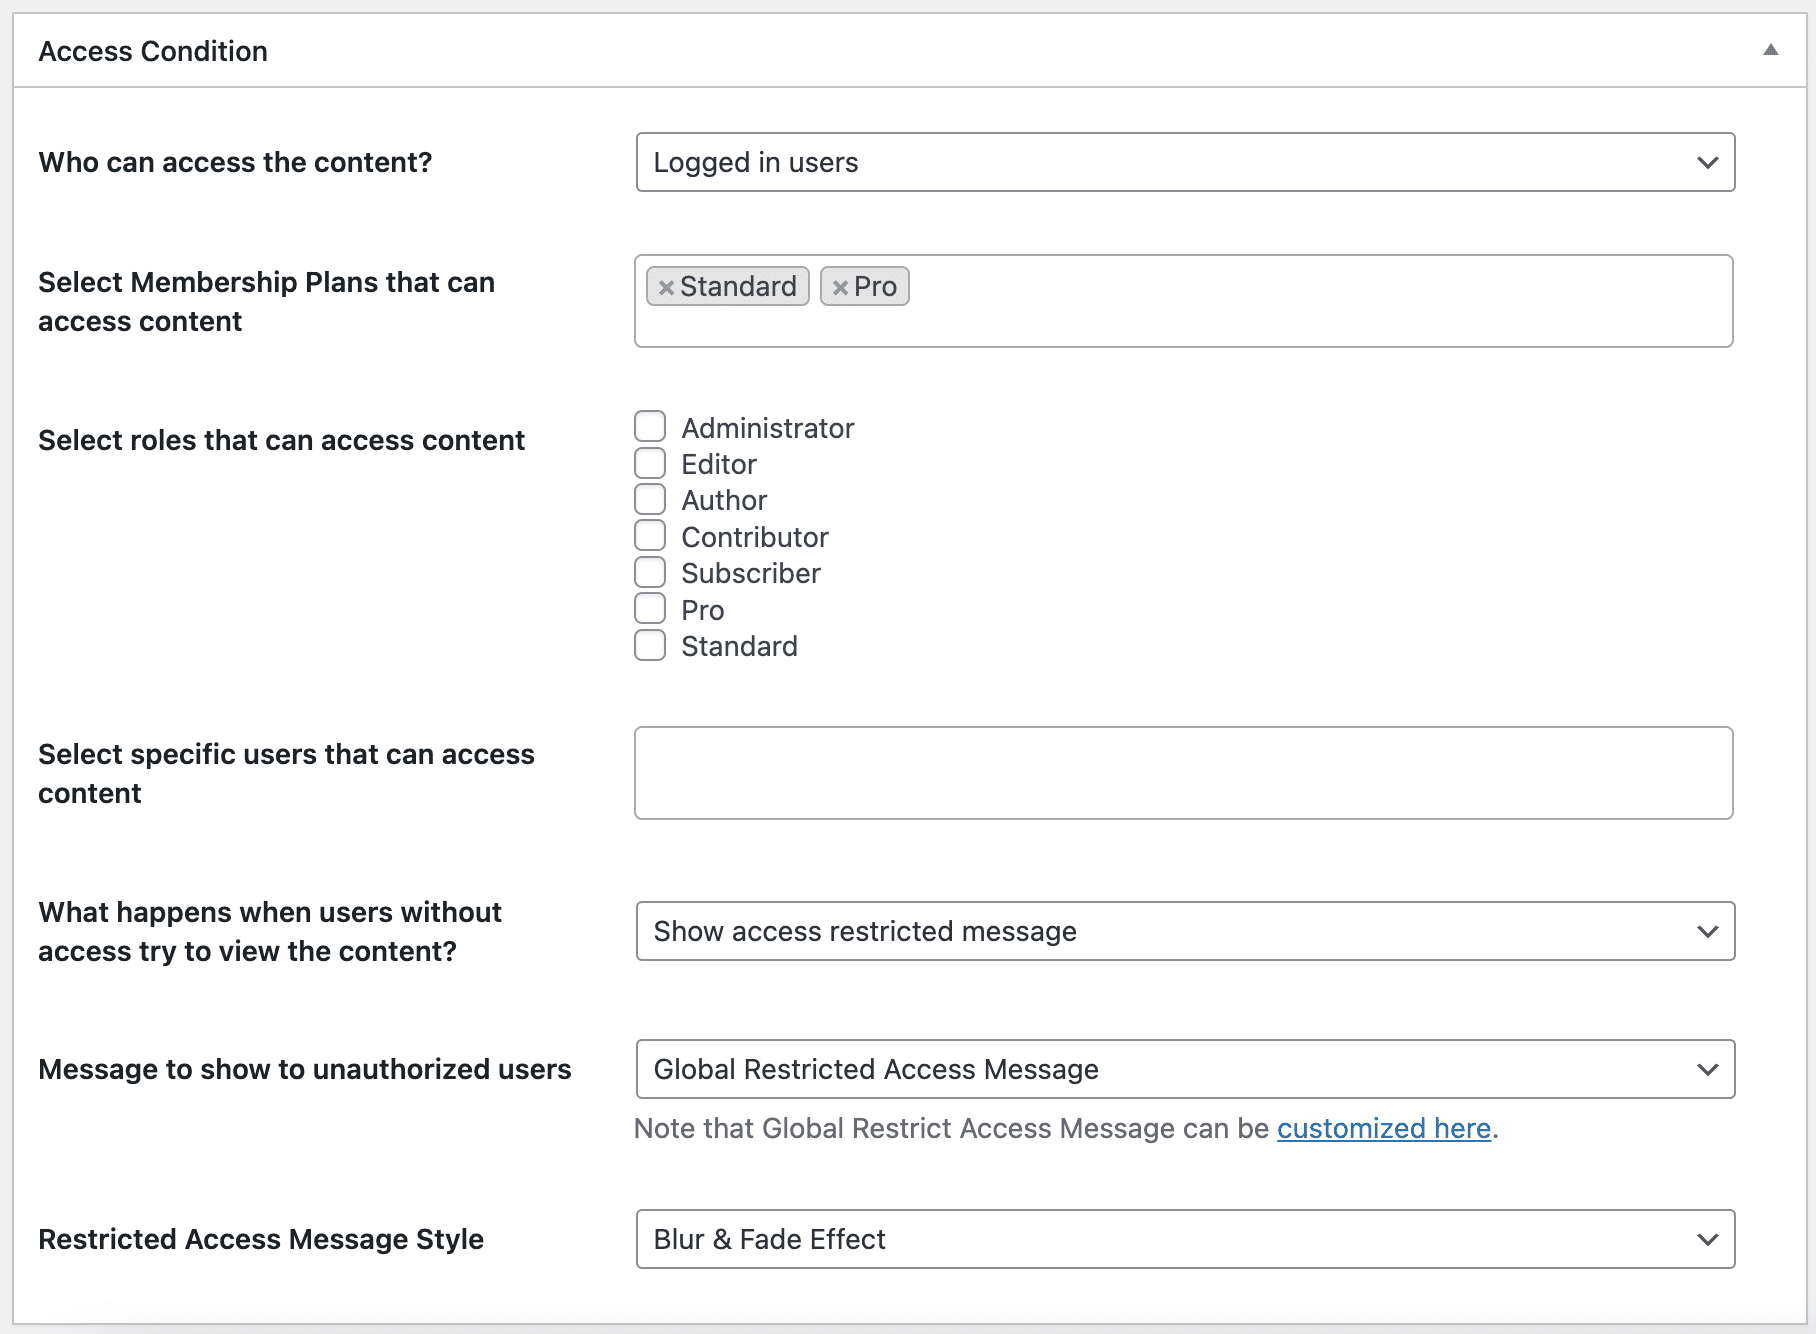
You should select the membership plans and user roles of the membership plan that you created in the step above. This will allow anyone you add to the membership plan access to the allowed contents.
When you’re satisfied with how the access rule is set up, click on the Save Rule button to store your settings.
You can create more content restriction rules by following the above-mentioned process.
Create a Client Account Page with ProfilePress
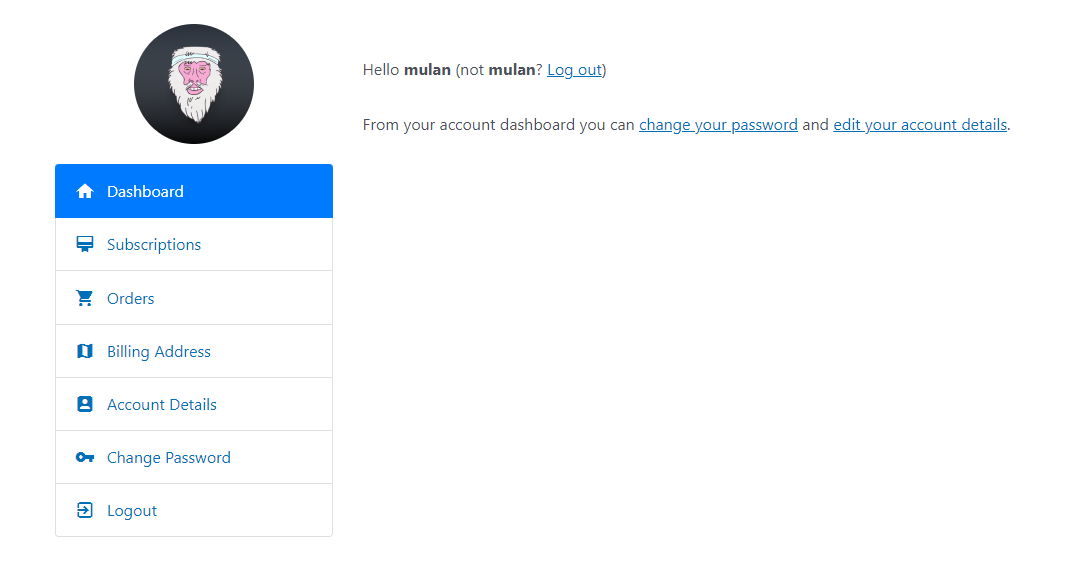
The next step is to create an Account page for your clients, which is the page the clients will see when they log into your portal.
On the “My Account” page, the client can update their profile information, change their account settings, change their password, manage their email list subscription, and lots more.
By default, ProfilePress will automatically create the account page for you during the setup and installation, but if this does not happen, follow the procedure below to manually create an account page for your clients.
To manually add the My Account page to your site, create or edit an existing page, add the following shortcode, and save/publish.
[ProfilePress-my-account]
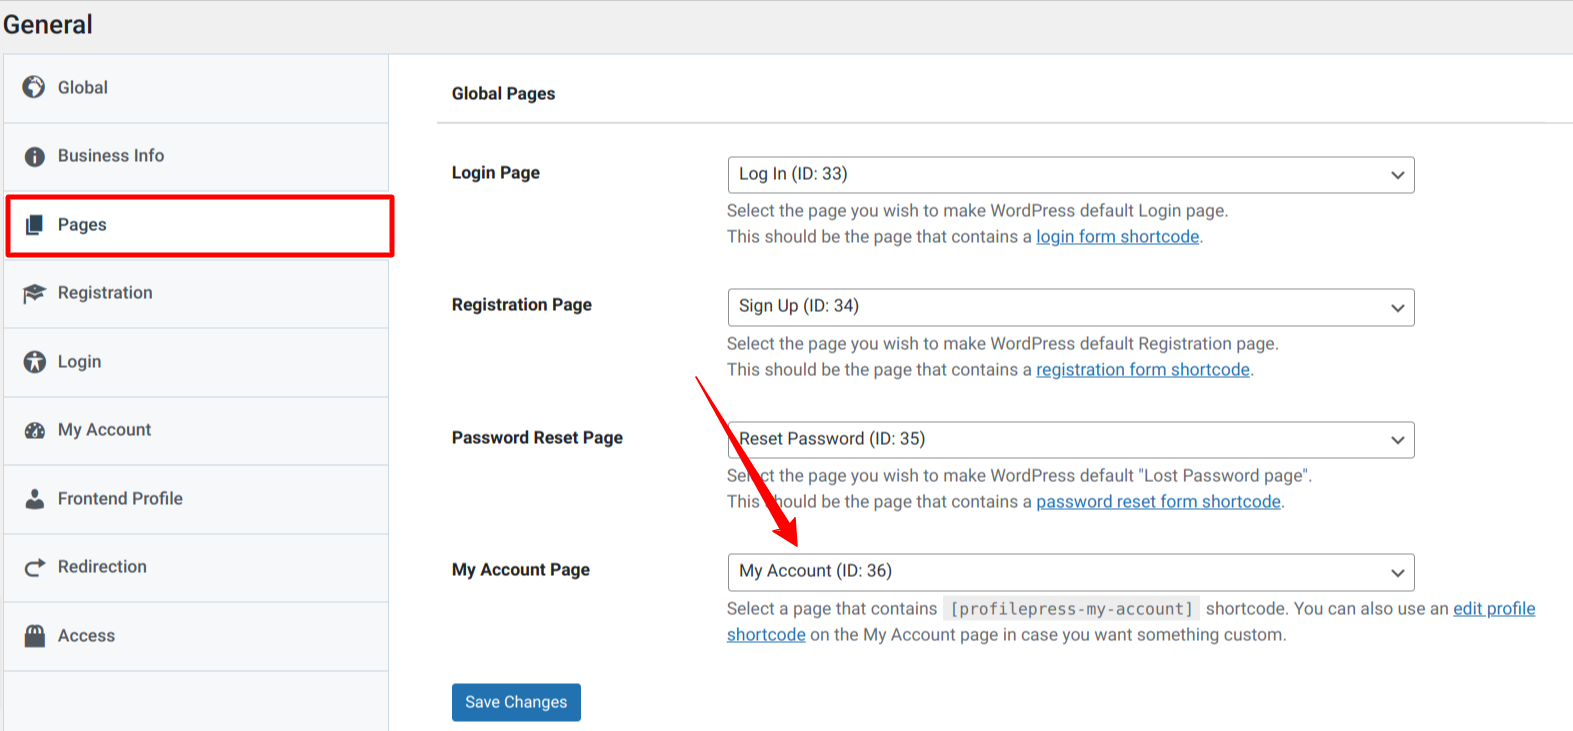
Next, navigate to ProfilePress > Settings > Pages and ensure this page is selected as the “My Account Page” on the ProfilePress settings page.
If everything is configured correctly, your clients will have an account page like the image below.
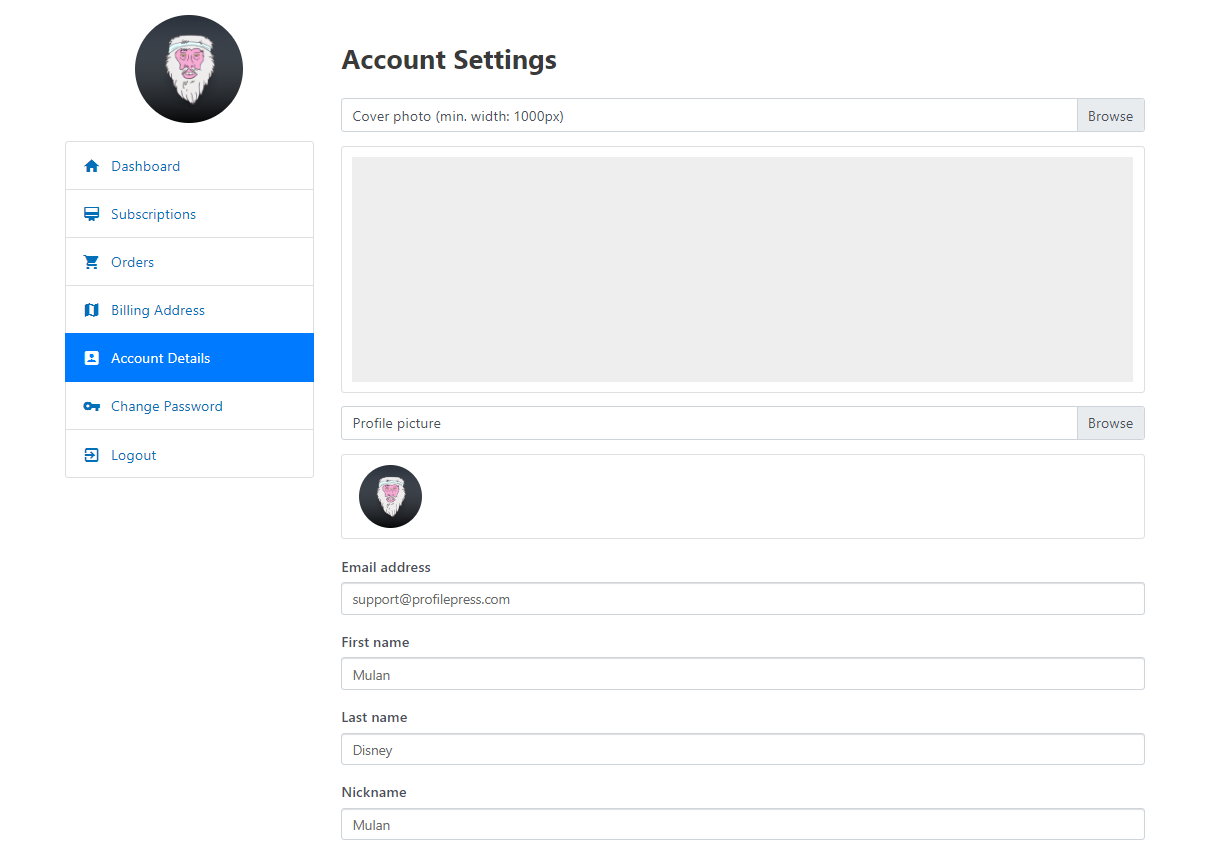
Customizing Client Account Page in ProfilePress
The current account page created above for our clients will display the same information for all clients, but we can customize this page to reveal exclusive content for each client when they log into their portal.
To achieve this, we will use the ProfilePress WordPress Content Restriction Shortcodes. The content restriction shortcodes will allow you to restrict access to some or all of your WordPress content to users based on their user roles, usernames/email addresses, or logged-in status.
We can wrap various contents in a shortcode and show them to the user based on their email/username, membership plans, or roles.
How to Restrict Content by Membership Plans
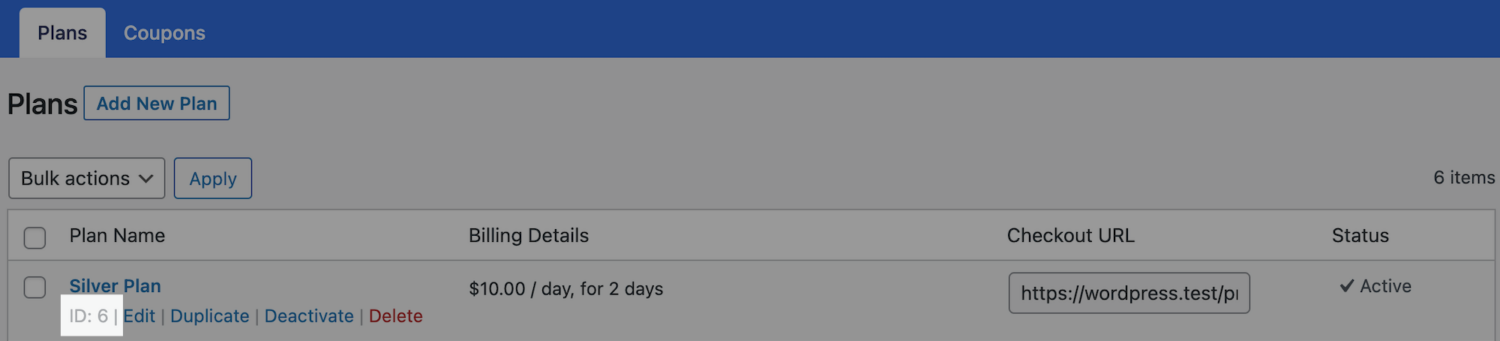
To restrict content based on membership plans, you will need to know the ID for that membership level. You can find the ID of all membership plans by navigating to ProfilePress > Membership Plans and hovering over the plan title.
The shortcode below will restrict content to users who have an active subscription to specific membership plans.
[pp-restrict-content plans="1"] content here [/pp-restrict-content]To restrict content to members of multiple active memberships, separate the membership plan IDs with a comma.
[pp-restrict-content roles="1, 3"] content here [/pp-restrict-content]How to Restrict Content by Username or Email
You could restrict content based on usernames or email addresses as an alternative to membership plans. The shortcode below will restrict content to specific users using their user IDs, usernames, or email addresses.
[pp-restrict-content users=”johndoe, sandra, [email protected], 12″] content here [/pp-restrict-content]
To use this shortcode on your account page, navigate to Pages from your WordPress dashboard and click on the “My Account” page to edit its content. You can then create a shortcode block above the content and a block below the content.
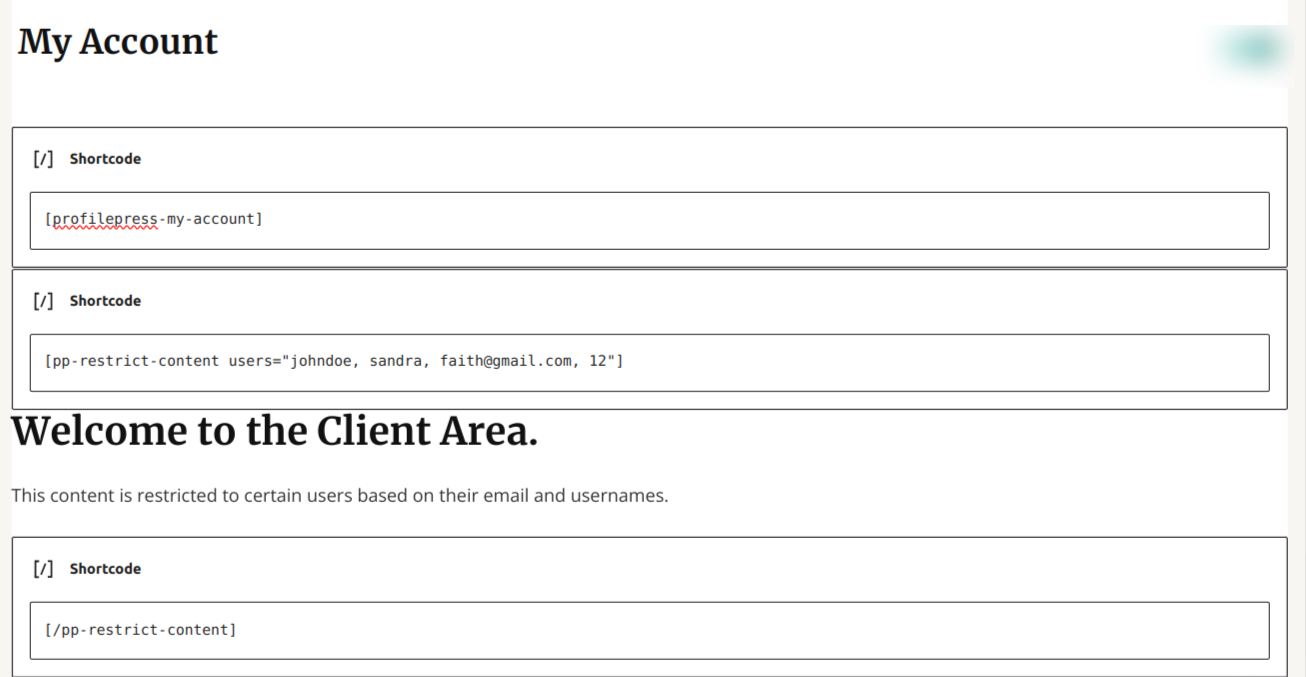
In the example above, we restrict the content between the upper and lower shortcode blocks to users based on their email, user ID, and usernames.
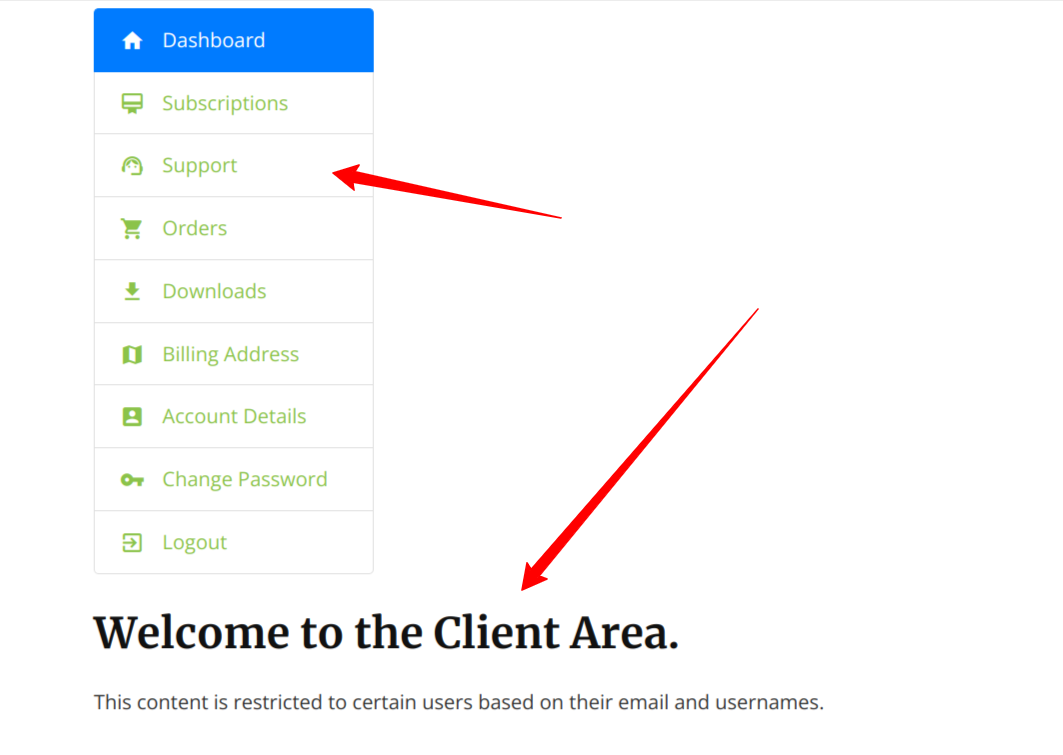
Click the “Publish” or “Update” button to apply your changes. Open the page in a private browser window, and you will discover that ProfilePress has hidden the content in this page section.
To view the content, log in to a client membership account, which is a part of the allowed users in the restriction shortcode, and the restricted content will be visible to you.
You can check out other ProfilePress Content Restriction Shortcodes.
How to Add Additional Menu Tabs to the My Account Page
The default “My Account” page has navigation links, such as subscriptions, orders, billing addresses, and account details.
However, you may want to add custom links to various pages exclusive to your clients to the client portal. For example, you might want to create a link to a dedicated support page or service for clients.
You can add more tabs to the Account page using code snippets from ProfilePress. The recommended way is to add these code snippets using the Code Snippets plugin, which allows you to add the code directly within your WordPress dashboard.
Alternatively, add the snippets directly to your theme or child theme’s functions.php file.
Adding Menu Tabs that Link to a URL
See the code snippet below to add a menu tab that links to a URL.
add_filter('ppress_myaccount_tabs', function ($tabs) {

    $tabs['custom_tab_id'] = [
        'title'    => esc_html__('Custom Tab Title', 'wp-user-avatar'),
        'priority' => 20,
        'icon'     => 'settings',
        'url'      => 'https://yourwebsite.com/support-page/'
    ];

    return $tabs;
});
After adding your custom tab, click the “Save Changes” button to save your changes.
Open the “My Account” page, and you will see a new menu tab and other changes you have made.
How to Add a Link to the Client Area
To help your clients easily access their client portal, it is important to include a link to this page in your site navigation menu, and you can easily do this with ProfilePress.
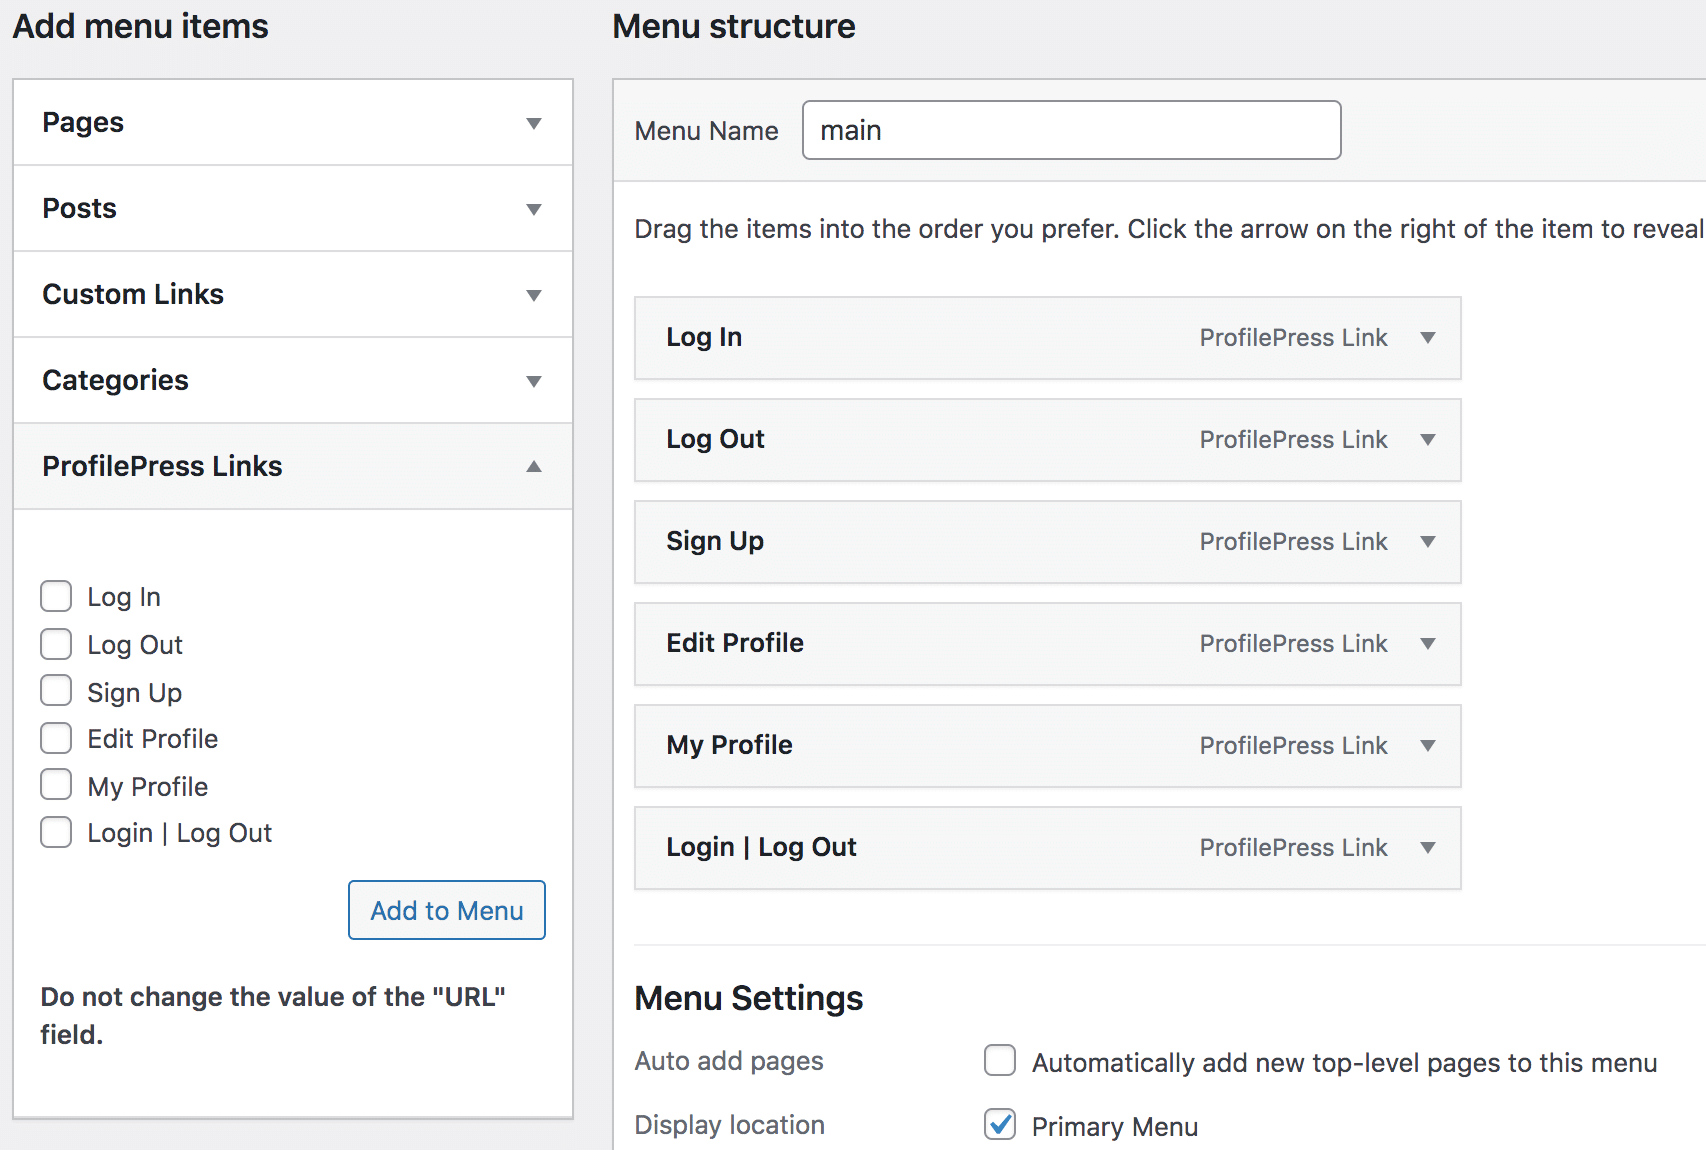
Navigate to Appearance >> Menu.
You will see a ProfilePress Links meta box on the left-hand side. Expand and add the links you want to include to your WordPress-powered website menu.
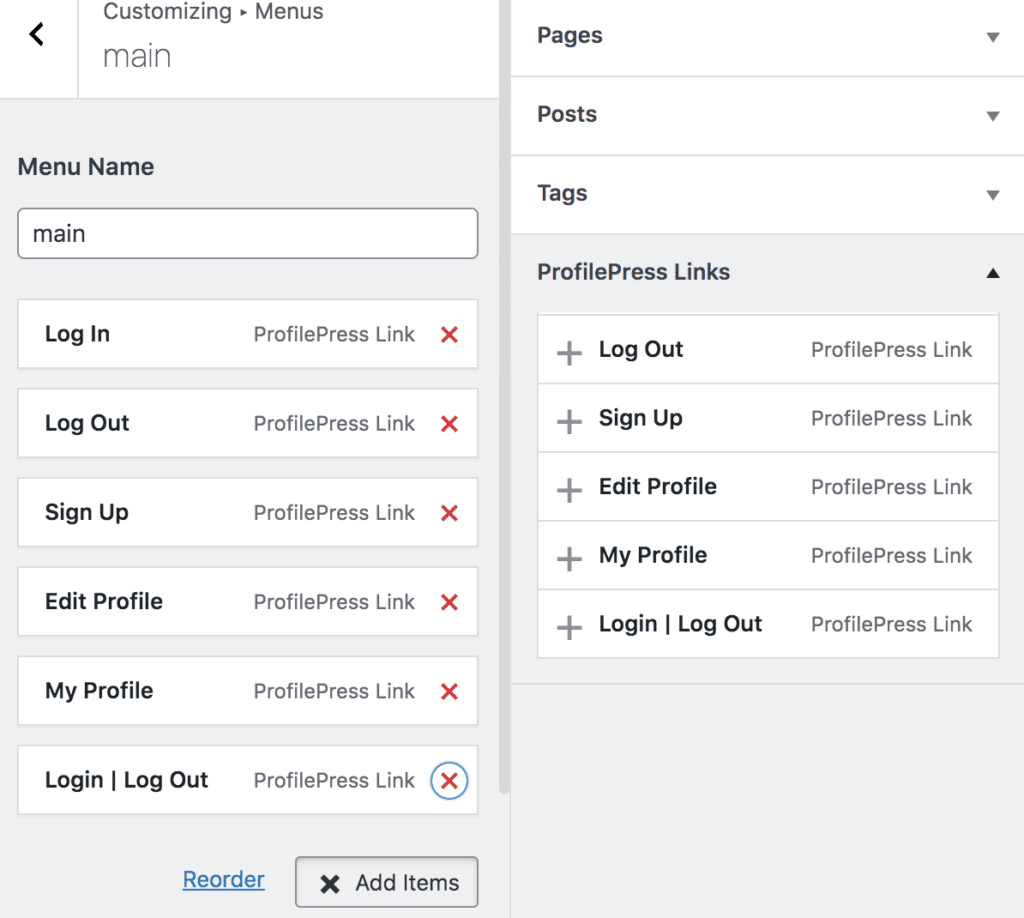
You can also add the login, logout, lost password, edit profile, and my profile links via the Customizer.
Note: The login and sign-up page links are hidden when a user is logged in. Also, the logout, my profile, and edit profile links are only shown to logged-in users, while in login/logout, the logout link is shown to logged-in users and login to users who aren’t logged in.
Conclusion
Following this guide, you should have created a functional client portal. Creating a client portal in WordPress is not rocket science. It can be easily achieved with the help of a membership plugin. ProfilePress gives us all the tools and features required to build a powerful and flexible client portal on a WordPress website.
Get ProfilePress today and start building excellent client portals.